Friday, March 13, 2015
My First Fairy Garden!
Yesterday was a very special day. My oldest daughter, and 1st born, turned 29. I can't believe I have a 29 year old child! Where did the time go?? It seems like such a short time ago that she was born. I still have vivid memories of her birth, our stay in the hospital, bringing her home and all the trepidation of being a brand new mom with a brand new baby. Now, after 5 babies, and into my journey as a grandparent, I'm finding that what they say about time going by faster as you get older really is true!
I wanted to make my daughter something for her special day, and have been wanting to make a fairy garden for some time, so combined the 2 wants to make my 1st fairy garden for her!
A couple of weeks ago I had found a bunch of little houses at the 2nd hand store, and on a whim, bought all of them with the intention of using them in fairy gardens. So, I had the beginnings already.
Next, I purchased a container to build the garden in. I chose a plastic 'terra cotta' pot that is low and wide. Then, found 3 plants that would suit the 'decor'. I chose a peppermint plant and a curry plant. Then added a succulent.
I also found these little mushrooms to add.
The dollar store was a great source for the stones, sand and glass pebbles. I bought a bag of potting soil and picked the moss on one of my walks with the dogs. Here on the west coast moss is abundant in the woods.
I filled the pot with the soil and then added the plants, making sure the root balls were covered and well seated.
Next, I pulled the moss into pieces the right size to fit around the plants and tucked it in, pressing it down into the soil.
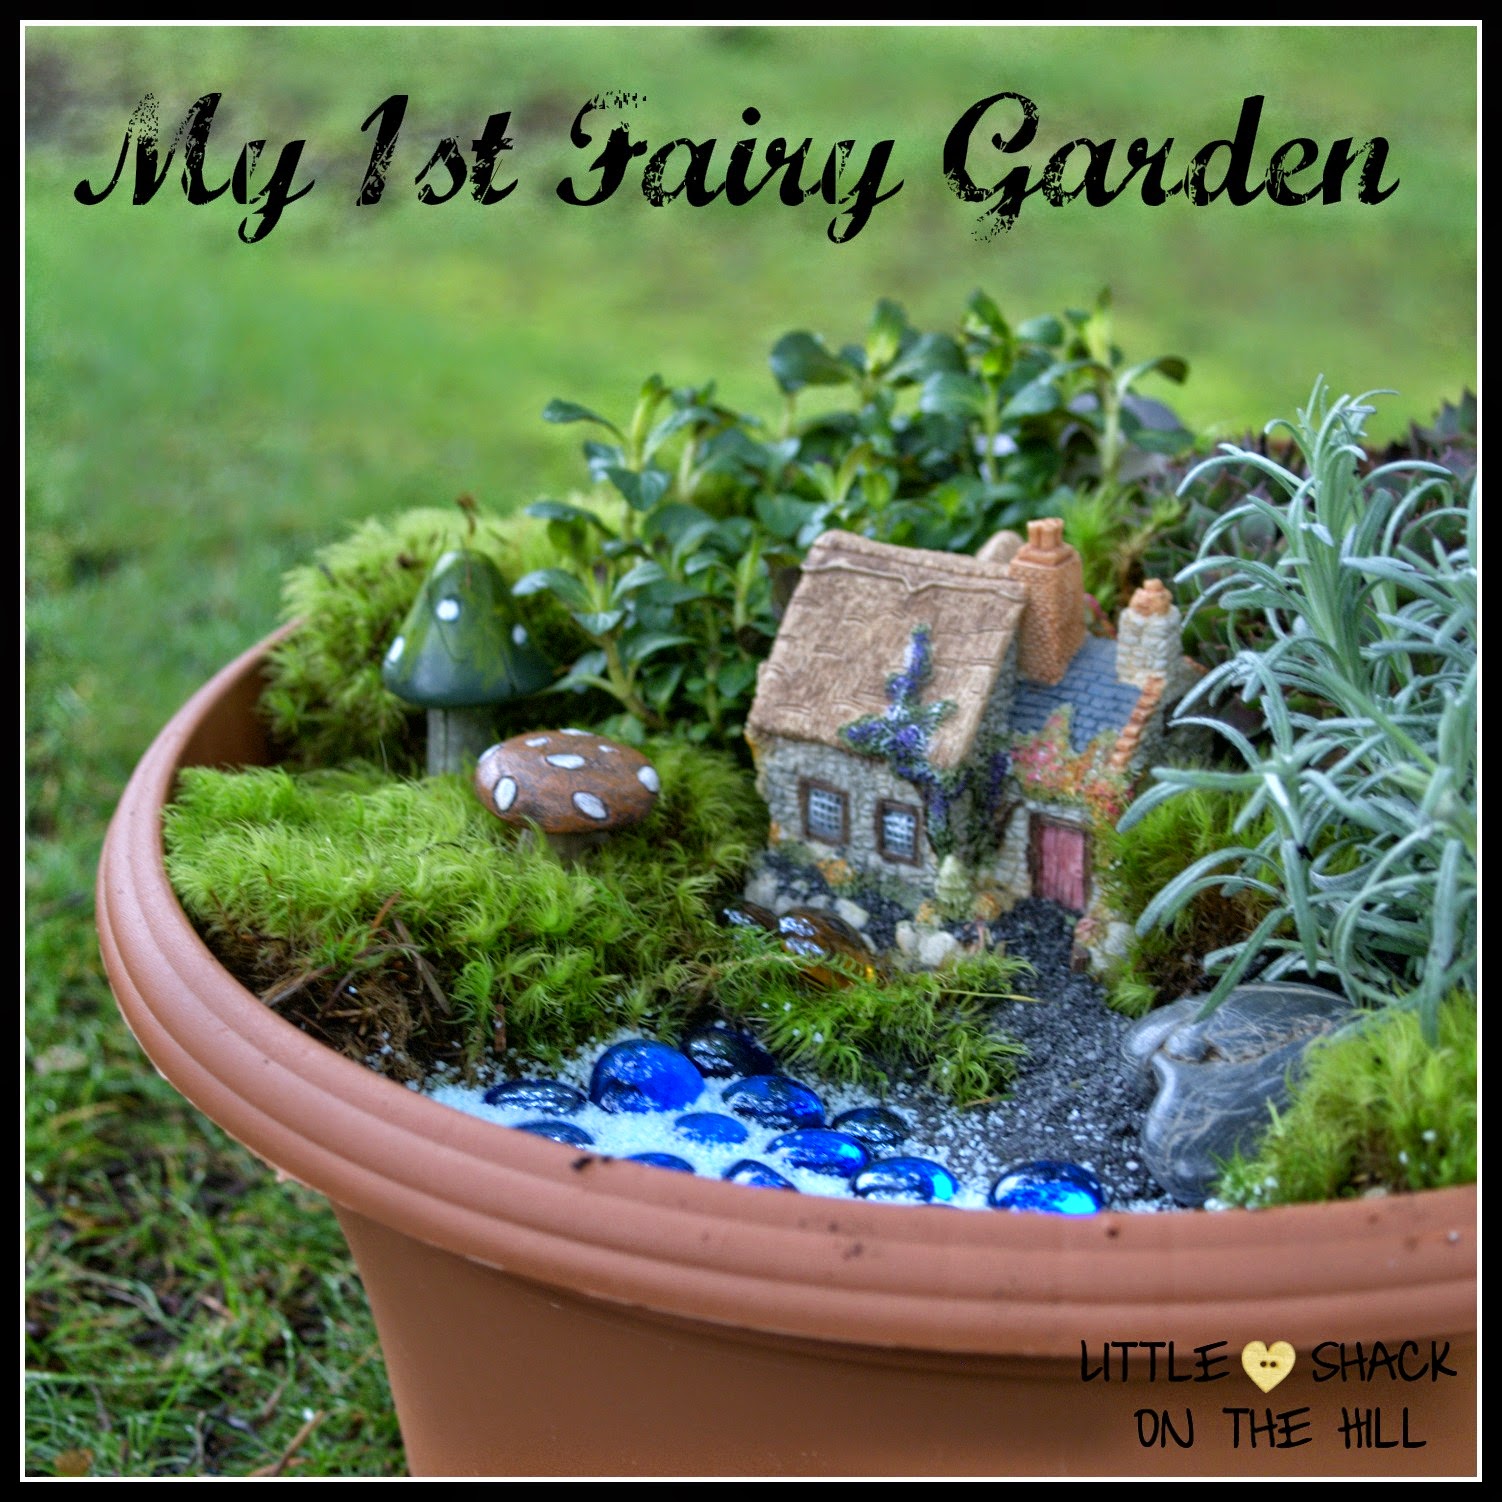
I left the part where I wanted to set up the fairy house and what I call 'the beach' bare. This is the fun part! Adding the little house and deciding how it should all fit together is what makes it a fairy garden. I wanted my house nestled into the moss, with the front looking out onto a sandy beach with what would be the water. I placed the house in and tucked some moss around it. The blue sand went in next, followed by the blue glass and then more blue sand. I used a dark grey sand for the beach and trickled it up the walk way of the house to tie it in. The little mushrooms, stones and brown glass were placed around the plants and moss to add interest.
I was pretty pleased with the end results. My daughter liked it too!
I have 4 more little houses still to use and am already planning out my next fairy garden. It was such a fun little project and not at all difficult to put together. I'll be keeping my eyes open for little bits and pieces to add to the next ones. Things like little bugs, animals, furniture, bridges....they don't have to be made specifically to use in a fairy garden. I think using things you find that aren't meant for this make it more unique and personal. I know I've seen little glass bridges meant for a gold fish bowl or aquarium, butterflies meant for flower arrangements, doll house furniture and accessories. Half the fun is the search for things you can add.
I'd really love to hear about the gardens you've created. What did you use?
Monday, March 9, 2015
Homemade Vanilla Flavoured Coffee Creamer
A few weeks ago I did a post on recipes using sweetened condensed milk and included my own recipe for making your own SCM. While searching for recipes to use it with I found several versions of homemade coffee creamers which called for a can of SCM. The canned version is a bit pricey, and in the end it would probably be cheaper to buy the flavoured creamers ready made. But, as most of us know, the kind you buy is full of all kinds of chemicals and has absolutely nothing your body needs in it. So, I decided to try making a batch of coffee cream, using my SCM recipe.
My recipe for sweetened condensed milk has only 5 ingredients in it, one of which is water. Let's whip up a batch!
Put on the kettle to boil the water needed (1/3 cup) and gather the other ingredients while it heats.
You will need :
1/3 cup boiling water
1 cup of powdered milk
a pinch of salt
2/3 of a cup of white sugar
and 3 tablespoons of melted butter, margarine, or coconut oil ( I used coconut oil in the recipe).
Put all the dry ingredients in a small mixing bowl. When the water is boiled, measure the 1/3 cup needed and then add the melted butter, margarine or coconut oil to the water. Then add it to the dry ingredients. Use a whisk and mix it up really well. It will be thick, just like the store-bought kind.
Next, add 1 and a 1/2 cups of milk ( we use 1%, so that's what I used ) and 1 tablespoon of vanilla extract to the sweetened condensed milk. Mix well. Pour it into a container to keep in the fridge. I used a wipe off marker to write the date I made it on the bottle so I would know how old it was later on. It will keep in the fridge for as long as your milk will. If the milk you use expires in a day or 2, you might want to get a fresh jug to make this with. Make sure to shake it up before each use.
Don't you just love the little bottle I used? I found these at Winners filled with hot chocolate mix. I got 3 of them in different hot chocolate flavours for Zac for Christmas. He enjoys the hot chocolate, and I get the cute bottles! It's a win-win!
I have to say, it is delicious! Way better than the store bought, full of chemicals version. I have a few more ideas for other varieties, so stay tuned for more!
Sunday, March 8, 2015
Fresh Versus Frozen Veggies-Which is Better For You?
It's March. What's growing in your garden? If you live in the Northern Hemisphere, probably not much. In a month or 2, if you grow a vegetable garden, you will probably be planting seeds, digging, weeding...and then later in the summer, harvesting your fresh home grown goodies! It's a wonderful thing to be able to grow your own food. You know exactly how it was grown. It's probably organic. Or, maybe you are one of those people who love to head out to the Farmer's Market on the weekends and grab the fresh produce sold there to feed your family on for the week.
Eating fresh produce is usually considered to be the best way to get your required serving of fruits and veggies. And in the summer months we don't have too many problems getting it fresh. If you buy local and in season produce, from local farmers and growers, you are pretty much guaranteed that you are getting the best.
During the winter months though, when the fields and trees are buried in snow, it comes down to buying what the grocery stores offer. Have you ever stopped to think where the produce in the grocery store came from? Or how it got to the store? Where did those bananas come from? Or the zucchini and lettuce? Obviously, they have had to travel from some other region to get to your grocery store produce aisles. In order for these 'fresh' foods to get to the store, they were picked before they reached their peak. In other words, they weren't ripe when they were harvested. And because they weren't ripe, they had not yet reached their full allotment of vitamins and minerals. While the fruit or veggie will look like it is ripe and ready to eat, it was actually denied it's full growing time so was also denied reaching it's full potential for goodness. What you are buying in the store is not really as nutritious as you think. And as people in general do not eat the recommended 9 servings a day (most people eat 3) of fruits and veggies we are getting even less of the vitamins and minerals we 'think' we are getting.
So, how do you make sure you are giving your family the most bang for your buck? What are the other options? Well, there is canned. And you can can your own vegetables from your garden. Unfortunately, the only produce that doesn't lose a bunch of nutrients in the canning process are tomatoes and pumpkin. ( Thanks goodness we can depend on our canned tomatoes! ) But what about the others? Buying frozen, or freezing your own home grown veggies, is your best bet. Produce bought frozen has the highest concentration of nutrients still intact. The freezing process is begun when the produce is picked at it's peak ripeness. Already it has it's full potential for nutrition. Then is it quickly blanched in boiling water or steam to kill any bacteria and stop any degrading. Although there is a small amount of vitamin C and B lost during this process, it is much less than what would be lost in canning or if the produce had not ripened fully. Freezing keeps the majority of the 'good stuff' in the vegetables and fruit, so you get more when you eat them.
Your best bet for frozen veggies are carrots, broccoli and leafy greens. Don't store them too long in your freezer-use them up! When it comes time to cook them, the microwave is great. Or boil a small amount of water in a pot, add the veggies, cover, bring to a boil and then drain. Don't over cook them.
Not only are frozen vegetables your best bet for winter time, they are also convenient and versatile! I find that I use them year round for convenience. I waste less because I only use what I need when I need it and it's not forgotten in my fridge crisper drawer, getting wilted and sad looking, destined for the compost pile.
Here is a link to 25 Ways to Use Frozen Mixed Vegetables which may inspire you to buy and use frozen. And another link to 15 Ways to Prepare Frozen Broccoli, which is one of the best vegetables to buy frozen.
If you haven't tried frozen, or have always thought fresh was better, I encourage you to try give them a whirl! You may even find it saves you money! Look for sales, interesting varieties and get creative!
Friday, March 6, 2015
Super Simple Chicken Enchiladas
Some of you may know that my chosen career, for which I went to school to learn and trained for, was cooking. Not cheffing....I began my chef's apprenticeship and quickly realized it was not the kind of cooking I wanted to do. I have worked as a cook at several times in my life. I have always preferred to cook in large quantities in camp situations. Maybe that's why I ended up with 5 kids! And probably why I still find myself cooking too much food now that it is just hubby and kid #5 at home!
In all my years of cooking, both for work and family, I had never, ever made enchiladas. I had eaten them a few times, but never got around to making them. So when I spotted a recipe for Easy Chicken Enchiladas on Pinterest and actually had some cooked chicken on hand to use in them, I decided to give it a whirl in my tiny RV oven.
My hubby had picked up a couple of already cooked chicken breast. (We have since started hoarding these when they go on for 50% off as the due date gets close, and freezing them.) I took the breasts and put them into my slow cooker/crock pot. I sprinkled on some packaged taco seasoning and some watering then let them cook for a couple of hours. (For anyone else cooking in an RV, I plug my crock pot in outside under the RV awning and let it cook out there. This helps to keep the moisture outside and not accumulating on the windows of the RV.)
After a couple of hours I checked the chicken and used two forks to start pulling it apart.
Next, I spread the enchilada sauce over the bottom of the pan very lightly. I used a canned sauce the first time I made these, and it was really good, but pricey. The next time I tried a packaged dry sauce mix you only have to add water to to make up. It was much spicier, darker in colour, and way cheaper.
Next came the fun part! Lay out your 10 inch tortillas on a flat surface. Down the centre arrange some of the cooked chicken, sprinkle on some cheese, and then some salsa.
Place the rolled enchilada in the pan on top of the enchilada sauce, seam down. Carry on with filling and rolling more enchiladas until your pan has a layer of rolled enchiladas covering the bottom.
Now, pour enchilada sauce over the rolled enchiladas. The do not need to be completely covered with sauce. Then sprinkle grated cheese over top of the sauce.
Time to put these puppies into the oven! 350 degrees F. for 20 minutes, until the cheese is melted and bubbly.
We like ours served with brown rice and refried beans, as well as salsa!
I don't really have a 'recipe' for these. It was all just kind of thrown together. I would suggest adding more taco seasoning if you like spicy, less if you don't. Add as much salsa and cheese as you like, depending on your taste. You can also make these using other meats like ground of any kind, pork, beef, turkey...just fry it up and then add the taco seasoning.
It has become a family favourite and gets made at least once a week! What's your family's most asked for meal?
Monday, March 2, 2015
Make An Easy Decorative Bottle or Jar
Many years ago, my Granny used to make these really cool bottles covered with masking tape and then rubbed with shoe polish.
They were wonderful for putting flowers in, both dried and fresh. Or on their own just as a decorative container. I remembered these bottles and containers the other day while washing out an empty jar. I decided to give it a try. I actually Googled it and discovered it was a craft that was created back in the 70's and was called a 'leather covered bottle'. Now, back then, Google was unheard of and home computers were still years away. So, I have no idea where my Gran learned how to do this, but she was an extremely creative person. She sewed Barbie clothes for my sister and I, pressed flowers and used them to make cards. She worked as a volunteer with handicapped adults in a facility where they made all kinds of crafts to sell. She made beautiful leather appliquéd wall hangings and used twigs and felt to make little people sculptures. She was such a wonderful Granny.
Now, I'm sharing with you her lovely bottle craft.
First, you need a container of some kind. It could be a bottle from pickles, wine or jam. Maybe a plastic peanut butter jar? Or any container you like!
Then, you need a roll of masking tape and some shoe polish. I chose a brown and a black polish. That's it!
You can cut or tear the tape into pieces. I chose to tear as it gives a more varied look. All you do is tear the tape and stick it onto the container! You can do this while watching TV, it takes very little concentration. Keep sticking the tape pieces onto the container, overlapping, going up and over the lip, on the bottom, all over. If your container has a label, just put it on thicker there. Vary the direction of the tape, and add where you think it needs more.
Once your container is completely covered, it is time to rub on the polish. Get a rag and start rubbing on the shoe polish. You can keep adding coats to make it darker. Once it is the colour you want, give it a buff with a clean rag. The bottle on the left was done with a combination of brown and then back, while the one on the right is just black.
I added some jute string because I love it on everything!! You can added all kinds of embellishments to yours.
There you have it! I'd love to see and hear about your containers and how you used them.
I used just the brown polish on this wine bottle version.
Monday, February 16, 2015
No Bake Chocolate Oatmeal Bars
Back when I was cooking in a tree planting camp, I was preparing for the summer by gathering recipes off the internet that would be suitable. It was the one and only season my daughter, Jordan, worked with me as the baker. It was a great summer, after which I worked for 2 more seasons with another less proficient baker, and then had had a enough! Anyways...this recipe is one I found on Allrecipes.com. The first time my daughter used it, she misread the recipe or got recipes mixed up (you have to bake cookies, bars and muffins, as well as a dessert for 60-80 very hungry tree planters a day) and it turned out very different from what it was supposed to. I think she mixed the chocolate and peanut butter mix with the oatmeal mix instead of layering it. But, what we thought was a flop, turned out to be one of the planters favourite treats to take in their lunches! So, if you are looking for more of a crumbley granola type treat, mix them all together and put into baggies!
Here is the 'correct' and more orthodox way to prepare this absolutely delicious and easy square!
Printable recipe here!
You will need only 6 ingredients. They are all pretty standard things you will have in your pantry.
Peanut butter, chocolate chips, vanilla extract, quick oats, brown sugar, and butter or margarine. You will also need two pots, a couple of spoons and a 9x9 inch pan.
Ready, set, go!
First, place 1 cup of margarine or butter into one of the posts and melt over medium heat. When it has melted, stir in 1/2 cup of brown sugar and 1 teaspoon of vanilla. Then mix in 3 cups of quick oats. Stir them well and let cook over low heat for 2 minutes.
Grab your 9x9 inch pan, grease it and then dump 1/2 the oatmeal mix in the pan and spread and press into the bottom.
Next, melt the chocolate chips and peanut butter together over low heat, stirring frequently until smooth.
Pour this over the oatmeal crust in the pan. Spread it over evenly.
Crumble the rest of the oatmeal mixture over the top of the chocolate-peanut butter and press gently.
Cover and put it into the fridge for 2-3 hours or overnight.
Bring it to room temperature before you cut it into bars, and then try to resist eating the whole thing yourself and not sharing it with your family!
I guarantee you will be making this again and again. So easy and way too good to forget!
Friday, February 13, 2015
Too Many Cards!!!-(Organize Your Store Cards)
If you are like me, you have a store card to use for points, discounts, membership, etc at the stores you shop at frequently, and infrequently. Most stores, both large and small want your business and offer some kind of reward for buying stuff from them. This usually means you get a plastic card to keep in your wallet to use when you make a purchase. They can really pile up. I had to get a separate wallet for all my store cards. And when you're standing in line searching through the stack trying to find the right one, it can be frustrating! I'm pretty sure you all are nodding your heads and going "been there, done that". I have the answer!!
I can't take credit for this idea...it was on You Tube somewhere, but do you think I can find it? No! If you happen to have seen it and know where to find it, I would love it if you would let me know so I can give credit where credit is due.
So, here we have this amazingly simple, yet totally brilliant idea for keeping your store cards organized, accessible and easy to find. It's such a great idea, someone really should get the credit for thinking of it.
Here it is...grab a one-hole punch, a key chain ring and your cards. That's it. That is all you need to be in store card organization heaven!
First gather all your cards. Then punch a hole using the hole puncher in the corner of each card.
It's important to watch where you punch the hole though. Make sure you aren't punching through the magnetic strip or bar code on the back of the card. You may have to turn cards back to front and turn them around to get the hole in a corner that doesn't have any important bits in it.
Once you've got all your holes punched, simply hook them all onto the keychain ring. Close and you're done!! Didn't I say it was simple?! AND brilliant?!
Isn't that cool!? All neat and tidy and easy to find the right one. I can't wait to pull this out next time I'm asked for my card.
Subscribe to:
Posts (Atom)


